Are you wrestling with the challenges of managing your Internet of Things (IoT) devices remotely? Secure Shell (SSH) offers a powerful, secure, and versatile solution, ensuring your data's integrity and confidentiality while simplifying remote device management.
In today's increasingly interconnected world, the ability to remotely access and manage IoT devices is no longer a luxuryit's a necessity. From smart homes and industrial automation to environmental monitoring and healthcare applications, the proliferation of IoT devices has created a landscape where secure and efficient remote management is paramount. This article serves as your comprehensive guide to leveraging SSH, the industry-standard protocol for secure remote access, to unlock the full potential of your IoT deployments.
Before we delve into the technical intricacies, let's consider the core benefits. SSH provides a secure, encrypted channel for communication, safeguarding your data from unauthorized access and protecting it from eavesdropping. This is particularly crucial in IoT environments, where sensitive information may be transmitted and processed. Furthermore, SSH simplifies remote device management. With SSH, you can execute commands, transfer files, and configure devices from a remote location as if you were sitting directly in front of them. This dramatically reduces the need for on-site visits, saving time, resources, and minimizing downtime. The ability to remotely troubleshoot issues, update software, and monitor device health is invaluable in ensuring the smooth and reliable operation of your IoT systems.
The following table contains data related to SSH setup and management. It will act as a guide to the reader, so they can easily configure and manage SSH in their environment.
| Aspect | Details |
|---|---|
| Definition of SSH | SSH (Secure Shell) is a cryptographic network protocol for operating network services securely over an unsecured network. |
| Core Functionality in IoT |
|
| Security Benefits |
|
| Prerequisites |
|
| Key Considerations |
|
| Reference Website | SSH.com Academy: Provides an in-depth tutorial on what is SSH, also how you can implement it. |
This tutorial will serve as your guide, leading you through the intricacies of SSH and its role in remote IoT device management. From the fundamental concepts to advanced configurations, we'll dissect every aspect, ensuring your IoT setup is both secure and efficient. Whether you're a novice or an experienced IT professional, this article is designed to enhance your understanding and provide you with actionable insights for successful implementation.
Let's begin by exploring the fundamental principle: security. The growing complexity of IoT ecosystems demands robust security measures, and SSH stands out as one of the most reliable protocols for secure communication. SSH provides a secure, encrypted channel, protecting your data from unauthorized access, tampering, and eavesdropping. This is achieved through a combination of cryptographic techniques, including encryption algorithms, key exchange protocols, and authentication mechanisms. By encrypting all data transmitted over the network, SSH ensures that even if intercepted, the data remains unreadable to unauthorized parties.
- Allthefallen Updates Info Anime Manga More Stay Informed
- Stray Kids Skz Members Age Birthdays Profiles In Facts
SSH employs a robust authentication process to verify the identity of users and devices attempting to connect. This typically involves the use of passwords or, more securely, cryptographic keys. Key-based authentication eliminates the vulnerability of passwords, making it more difficult for attackers to gain unauthorized access. Moreover, SSH provides a mechanism for verifying the integrity of the data transmitted. This ensures that the data has not been tampered with during transit, further enhancing the security of your IoT devices. When you understand the importance of these security features, it's easier to appreciate the importance of SSH.
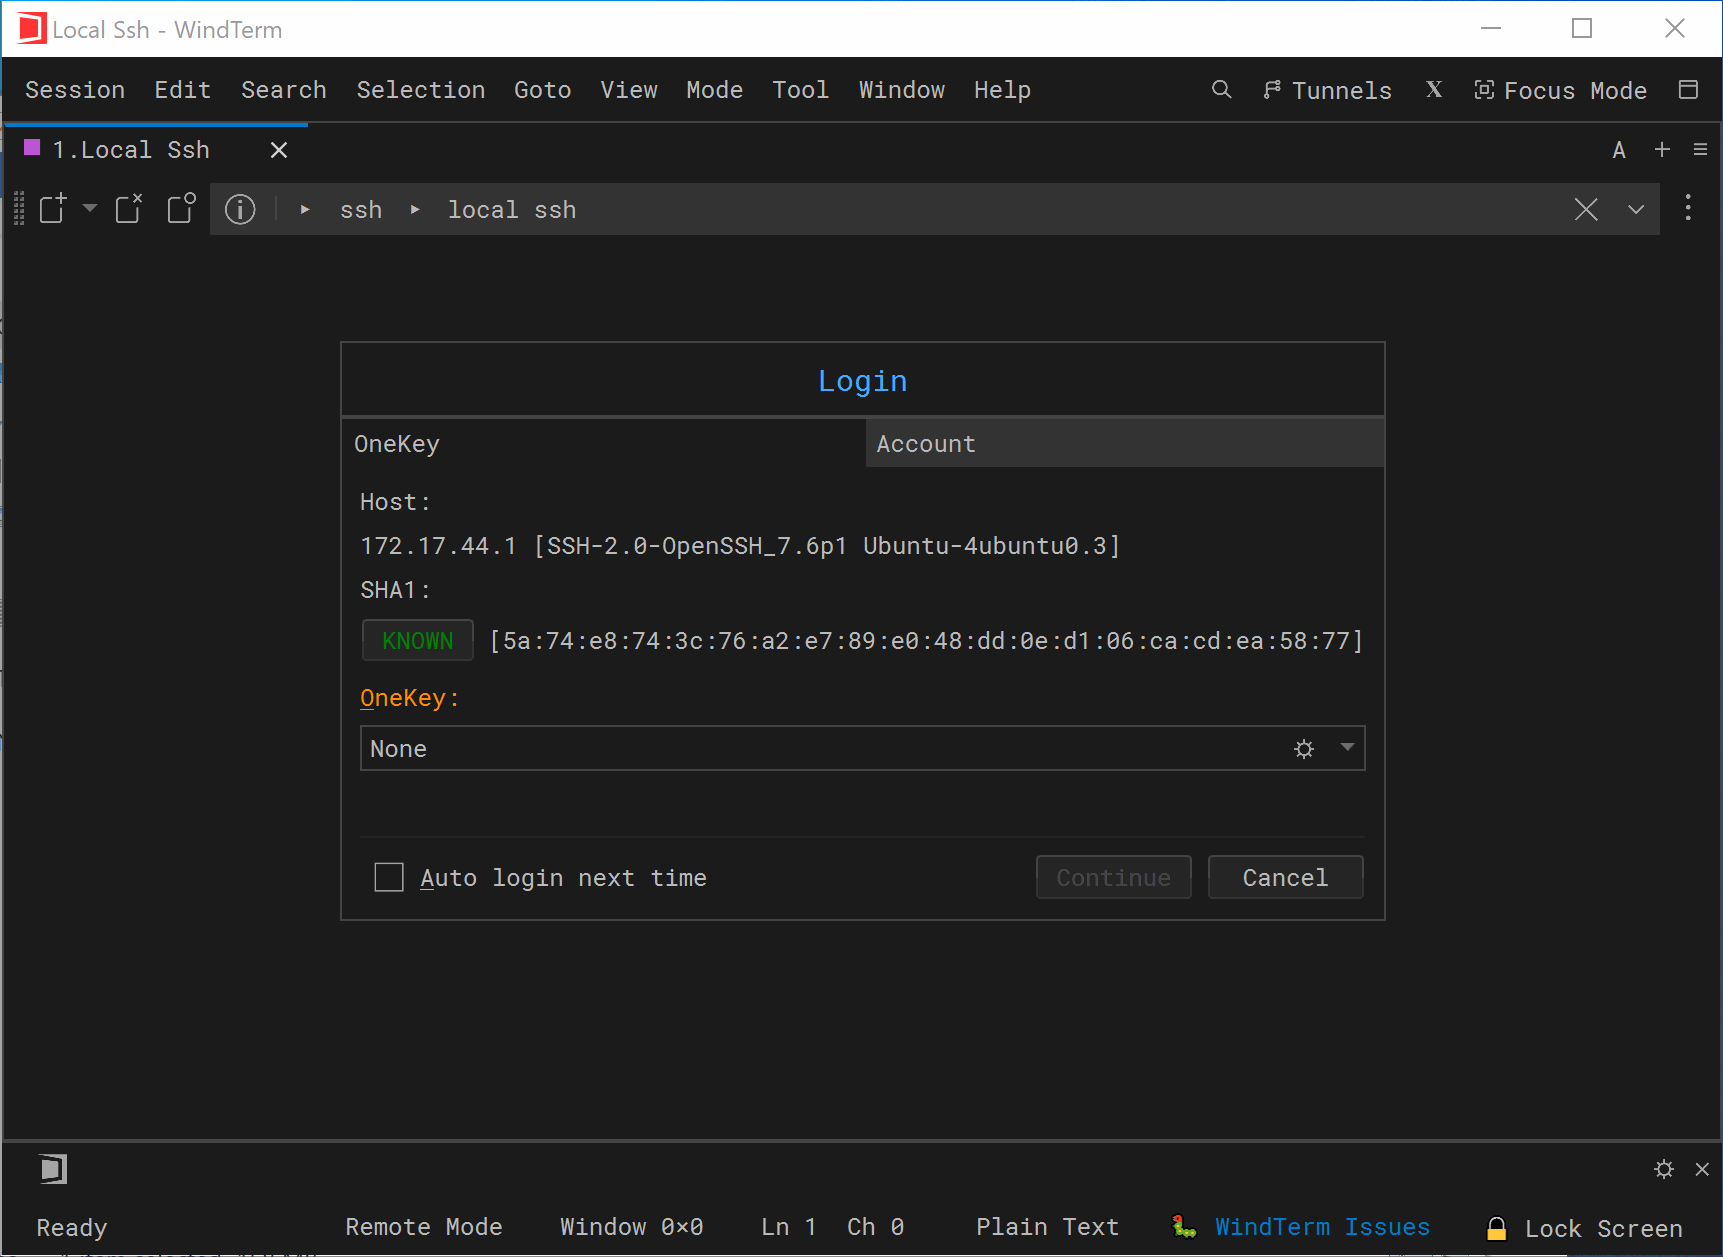
Now, let's walk through the process of establishing an SSH connection to your IoT device, step by step. This tutorial focuses on practical application, offering actionable tips and insights for effective implementation. The remote IoT platform allows developers to connect to your IoT devices as an SSH client in a web browser. The remote IoT web SSH client can access IoT devices from anywhere via a standard web browser, which simplifies remote management. To get started, you'll need a few essential components: an SSH client, an SSH server running on your IoT device, and network connectivity between the two.
Before you can access your IoT devices remotely via SSH, you need to ensure that SSH is installed and configured properly. Enabling SSH on an IoT device involves several steps. The first is, to check if SSH is already installed, if not, you can install it using package managers like `apt` or `yum`. The installation process may vary depending on the operating system of your IoT device. For example, on a Debian-based system like Raspberry Pi OS, you can typically install SSH using the following command: `sudo apt-get update && sudo apt-get install openssh-server`. After installation, the SSH service should start automatically. You can verify its status using the command: `sudo systemctl status ssh`. If the service isn't running, start it with: `sudo systemctl start ssh` and enable it to start on boot with: `sudo systemctl enable ssh`.
Once the SSH server is set up, you'll need to configure it to suit your needs. This typically involves setting up user accounts, defining authentication methods, and adjusting security settings. A fundamental step is to change the default password of the user account to a strong, unique password. This helps to prevent unauthorized access. Next, configure SSH key-based authentication. This provides a more secure authentication method. Generate an SSH key pair on your client machine and copy the public key to the authorized_keys file on the IoT device. This allows you to connect without entering a password, enhancing security.
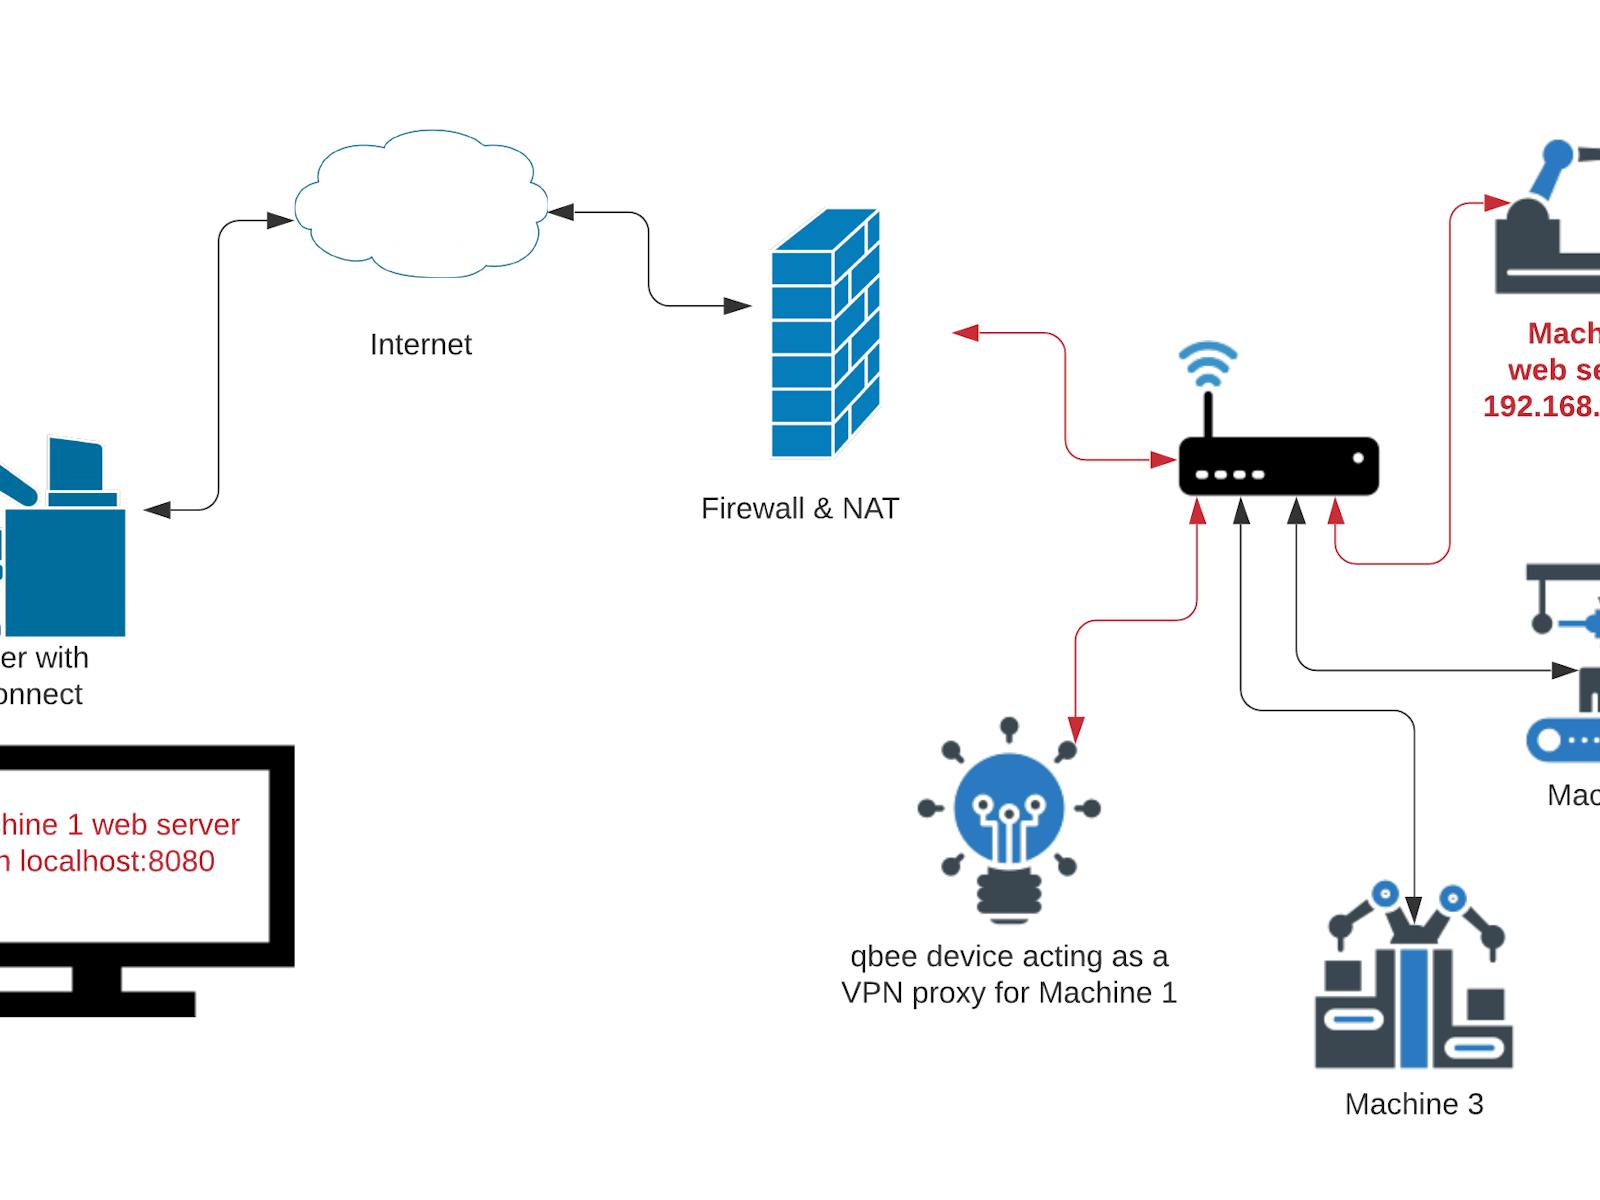
Setting up SSH behind a router involves several steps. First, you must configure the router to forward traffic on port 22 (the default SSH port) to the internal IP address of your IoT device. This allows external connections to reach your device. You'll typically find this configuration under the "Port Forwarding" or "Virtual Servers" section of your router's administration interface. You'll need to specify the port (22), the protocol (TCP), the internal IP address of your IoT device, and potentially the starting and ending port numbers. Secondly, set up a static IP address on your IoT device to prevent the IP address from changing and breaking your connection. You can set the static IP address either through the router's DHCP configuration or directly on the IoT device's network settings.
With the SSH server configured and your router set up for port forwarding, you're ready to connect to your IoT device. You can use the destinationconfig parameter to specify the name of the destination device (for example, remotedevice1) and the service that you want to use to access the destination device, such as ssh. Optionally, you can also specify additional parameters such as tunnel description and tags. Using an SSH client, you can connect to your IoT device from a browser. You'll need the external IP address of your router and the SSH port configured in the port forwarding settings. Enter the external IP address and port number into your SSH client, along with the username and password (or your key) for the IoT device. If everything is set up correctly, you should now have a secure SSH session to your device. From here, you can execute commands, transfer files, and manage your IoT device remotely.
The tutorials show you how you can open a tunnel and then use that tunnel to start an SSH session to a remote device. The prerequisites for running the tutorial can vary depending on whether you use the manual or quick setup methods for opening a tunnel and accessing the remote device. Mastering these commands is crucial for efficient SSH remote IoT device management. For example, to connect to an IoT device using SSH, you might use a command such as: `ssh username@your_iot_device_ip_address -p port_number`. Here, `username` is your username on the IoT device, `your_iot_device_ip_address` is the IP address of the device (or its hostname, if you have DNS configured), and `port_number` is the port your SSH server is listening on (usually 22). Remember to replace these placeholders with your actual credentials and settings.
One of the critical aspects of managing IoT devices is ensuring secure remote access. SSH (Secure Shell) provides a robust solution for this purpose. From configuring the router to enabling SSH on the IoT device, we've covered the essential steps. Remote IoT device SSH not only ensures secure communication but also simplifies the process of managing IoT devices from afar. Whether you're a beginner or an advanced user, this tutorial will enhance your understanding of remote IoT management. These features make SSH an ideal choice for remote IoT device management, where security is paramount. By the end of this guide, you'll have a solid understanding of SSH remote IoT, including setup, configuration, and best practices for maintaining secure connections. This article will delve into the intricacies of using SSH with IoT devices, providing practical insights and actionable tips for effective implementation.

Detail Author:
- Name : Betsy Murazik IV
- Username : dagmar24
- Email : fae.mohr@kuhic.com
- Birthdate : 1981-02-21
- Address : 8896 Scarlett Corners Apt. 724 East Shayna, NJ 79122
- Phone : (458) 724-4694
- Company : Maggio-Volkman
- Job : Textile Cutting Machine Operator
- Bio : Quia maxime animi qui. Animi consequatur nostrum qui repellendus.
Socials
instagram:
- url : https://instagram.com/arnold_schuppe
- username : arnold_schuppe
- bio : Qui et aut et culpa sint sint voluptatem. Accusamus aut illo esse aut voluptatem et iusto.
- followers : 4747
- following : 1486
facebook:
- url : https://facebook.com/arnold_schuppe
- username : arnold_schuppe
- bio : Rem ut voluptates dolorem. Sed quia et qui et in eius.
- followers : 1645
- following : 1450
linkedin:
- url : https://linkedin.com/in/arnold.schuppe
- username : arnold.schuppe
- bio : Mollitia voluptas non possimus reiciendis dicta.
- followers : 626
- following : 1312
