Can you truly wield the power to remotely control your Internet of Things (IoT) devices from anywhere in the world, right from your Ubuntu machine? The answer is a resounding yes, and the key lies in mastering the art of Secure Shell (SSH) access.
The digital world is increasingly interconnected, and the proliferation of IoT devices is a testament to this evolution. From smart homes and automated offices to complex industrial systems, these devices are transforming the way we live and work. However, managing and maintaining these devices, often deployed in remote locations, presents a unique challenge. This is where the power of SSH comes into play. SSH, or Secure Shell, is a cryptographic network protocol that allows for secure remote access to a computer or server. It creates a secure channel over an unsecured network, enabling you to manage your devices, troubleshoot issues, and automate tasks, no matter where you are.
Imagine the convenience of being able to monitor your home security system while on vacation, or the ability to remotely update the firmware of your industrial sensors from the comfort of your office. These scenarios, once considered futuristic, are now easily achievable with the right knowledge and setup. Mastering IoT SSH access on an Ubuntu server is not just a technical skill; it's a gateway to enhanced efficiency, streamlined operations, and unparalleled control over your connected world.
- Denny Duquettes Death On Greys Anatomy A Look Back Google Discover
- Autumn Renae News Videos More Your Favorite Internet Crush
This guide will serve as your comprehensive roadmap to navigating the intricacies of setting up secure and efficient SSH connections for your IoT devices. From understanding the fundamental concepts of IoT and SSH to configuring connections on both Ubuntu and Windows, this article will empower you to take full control of your remote devices. We will delve into the essentials of securing your connections, and then we will discuss how to troubleshoot any common issues that may arise.
We will unravel the simplicity of setting up SSH on Ubuntu, guiding you through the necessary steps with clarity and precision. You'll learn how to establish a secure channel between your devices and your management console, allowing you to maintain a seamless connection. By the end of this guide, you'll be equipped with the knowledge to remotely manage your IoT devices from virtually anywhere, enhancing your efficiency and providing you with peace of mind.
The ability to remotely access your Linux server via SSH from anywhere is no longer a distant dream. It's a tangible reality within your grasp. By following the steps outlined in this guide, you can access and manage your IoT devices securely.
- Jonathan Nowzaradans Megalomedia The Untold Story
- Understanding No Lube No Protection Meaning Meme Origins
The power of SSH is that it allows administrators and developers to remotely manage and interact with servers from anywhere in the world. It's like having a remote control for your entire smart home or office setup.
So, whether you're a seasoned tech professional or a curious enthusiast, this guide will equip you with the knowledge and confidence to set up, secure, and optimize your SSH connections. Embark on this journey and unlock the full potential of your IoT devices, ensuring they operate seamlessly and securely, regardless of your location.
Key Concepts and Applications of SSH in the IoT World
Before we dive into the technical aspects, let's explore why SSH is such a vital tool in the IoT landscape. IoT devices, by their very nature, are designed to collect, transmit, and process data. They often rely on servers to store this data, run applications, and manage their various tasks. SSH provides a secure and efficient way to interact with these servers remotely. It is a versatile tool with numerous use cases across diverse domains. Here are some common applications of SSH:
- Remote Management: SSH allows you to remotely manage your IoT devices, including configuring settings, installing software, and performing system updates.
- Data Retrieval: You can use SSH to securely retrieve data from your IoT devices, such as sensor readings, device logs, and performance metrics.
- Troubleshooting: SSH is a powerful tool for troubleshooting issues with your IoT devices. You can access system logs, diagnose problems, and implement solutions remotely.
- Automation: SSH enables you to automate tasks on your IoT devices, such as running scripts, scheduling maintenance, and controlling device behavior.
- Security: SSH provides a secure channel for communication, protecting your IoT devices from unauthorized access and data breaches.
Understanding these use cases will help you fully appreciate the power and flexibility of SSH in the context of IoT.
Setting Up SSH Access on Ubuntu
Setting up SSH access on Ubuntu is as straightforward as following a recipe. Here's how you do it:
- Fire up the terminal on your Ubuntu machine. It's your command center for this task.
- Update the system: Before you begin, it's crucial to ensure your system is up-to-date. Open the terminal and run:
sudo apt update && sudo apt upgrade -y
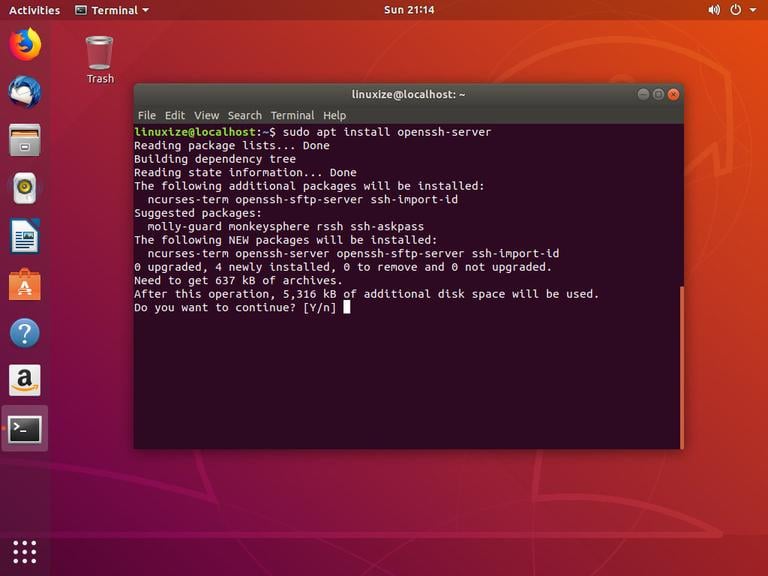
This command updates your package lists and upgrades all installed packages to their latest versions. - Install OpenSSH Server (if not already installed): OpenSSH is the standard SSH implementation on Linux. If it's not already installed, you can install it using the following command:
sudo apt install openssh-server -y
- Verify SSH service status: After installation, check the status of the SSH service to ensure it's running:
sudo systemctl status ssh
If the service isn't running, start it with:sudo systemctl start ssh
- Configure the SSH server (optional, but recommended for security): The SSH configuration file is located at /etc/ssh/sshd_config. You can edit this file to customize SSH settings, such as the port number, allowed users, and authentication methods.
sudo nano /etc/ssh/sshd_config
Here are some key configurations to consider:- Port: Change the default port (22) to a non-standard port for added security. For example, Port 2222.
- PermitRootLogin: Disable root login for security. Change it to no.
- PasswordAuthentication: Disable password authentication (use key-based authentication instead). Change it to no.
- AllowUsers: Specify which users are allowed to connect. For example, AllowUsers your_username.
sudo systemctl restart ssh
- Configure Firewall: Ubuntu typically uses UFW (Uncomplicated Firewall). Allow SSH traffic through the firewall.
sudo ufw allow ssh
If you changed the SSH port, allow traffic on the new port as well:sudo ufw allow 2222 # Replace 2222 with your chosen port
- Key-Based Authentication (Recommended): For enhanced security, set up key-based authentication. Generate an SSH key pair on your client machine (the machine you'll connect from):
ssh-keygen -t rsa -b 4096
This will generate a public and private key. Copy the public key to your Ubuntu server:ssh-copy-id your_username@your_server_ip
Now, you should be able to log in without a password. - Test the Connection: From another computer on your local network (or, if you've set up port forwarding, from anywhere), try to connect to your Ubuntu server:
ssh your_username@your_server_ip
If you've configured key-based authentication, you should connect without being prompted for a password. If you changed the port, use the -p option:ssh -p 2222 your_username@your_server_ip
With these steps completed, you've successfully set up SSH access on your Ubuntu machine. You can now remotely manage your server from any location, given you have the correct permissions and network configurations in place.
Connecting to Your IoT Devices from Anywhere
Once you have SSH access set up on your Ubuntu server, connecting to your IoT devices from anywhere in the world is the next step. This typically involves a combination of configuring your network and understanding the security best practices. Here are the essential points:
- Static IP or Dynamic DNS: Your Ubuntu server needs either a static IP address or a dynamic DNS (DDNS) service to be accessible from the internet. A static IP ensures your server's address never changes. If your IP address is dynamic (changes periodically), a DDNS service provides a domain name that always points to your current IP address. Services like No-IP or DynDNS offer DDNS solutions.
- Port Forwarding (on your router): Your router acts as a gateway between your local network and the internet. To allow incoming SSH connections, you'll need to configure port forwarding. This involves:
- Logging into your router's configuration interface (usually through a web browser, e.g., 192.168.1.1 or 192.168.0.1 - consult your router's documentation).
- Finding the "Port Forwarding" or "Virtual Servers" section.
- Creating a new rule that forwards traffic on the SSH port (typically 22, or your custom port) to the internal IP address of your Ubuntu server.
- Firewall Configuration: Ensure your router's firewall allows incoming SSH traffic on the forwarded port.
- External IP Address: Once port forwarding is set up, you'll use your router's public IP address (the IP address assigned to your home network by your ISP) to connect to your Ubuntu server from the outside. You can find this IP address by searching "what is my ip" on a search engine.
- Connecting from a Remote Machine: From a machine outside your local network (e.g., your laptop at a coffee shop), use the SSH client (e.g., the terminal on Linux/macOS or PuTTY on Windows) to connect to your Ubuntu server.
ssh your_username@your_public_ip_address -p [your_ssh_port] # use the -p option if you changed the port
Keep in mind that you might need to configure additional settings such as port forwarding on your router. This ensures secure access from remote locations. This configuration might vary depending on your router's manufacturer. If you have a dynamic IP address, ensure your dynamic DNS service is updated with your current IP.
Security Best Practices for Secure SSH Connections
Securing your SSH connections is paramount to protecting your IoT devices and the data they generate. Here are some crucial security best practices:
- Use Strong Passwords and Key-Based Authentication: If you use passwords, choose strong, unique passwords. However, key-based authentication is significantly more secure. Disable password authentication entirely in your SSH configuration (sshd_config) to minimize the risk of brute-force attacks.
- Change the Default SSH Port: As mentioned earlier, changing the default SSH port (22) to a non-standard port can deter automated attacks that target the default port.
- Disable Root Login: Never allow direct root login via SSH. Instead, log in with a regular user account and then use `sudo` to perform administrative tasks. This limits the potential damage from a compromised account.
- Regularly Update Your System: Keep your Ubuntu system and all installed software updated with the latest security patches. This helps protect against known vulnerabilities.
- Use a Firewall: Enable a firewall (e.g., UFW) and only allow traffic on the necessary ports. This prevents unauthorized access to your server.
- Monitor SSH Logs: Regularly review your SSH logs (usually in /var/log/auth.log or /var/log/secure) for suspicious activity, such as failed login attempts.
- Implement Intrusion Detection Systems (IDS): Consider using an IDS like Fail2Ban to automatically ban IP addresses that repeatedly fail to log in.
- Use Two-Factor Authentication (2FA): For enhanced security, implement two-factor authentication (2FA) for SSH logins. This adds an extra layer of security by requiring a code from a mobile app or hardware token in addition to your password or key.
- Disable Unused Services: Disable any unnecessary services running on your server to reduce the attack surface.
- Regular Security Audits: Periodically conduct security audits to assess your system's security posture and identify potential vulnerabilities.
By implementing these best practices, you can significantly enhance the security of your SSH connections and protect your IoT devices from malicious attacks.
Troubleshooting Common SSH Issues
Even with careful setup, you might encounter issues when working with SSH. Here's a guide to troubleshooting some common problems:
- Connection Refused: This usually indicates a problem with the SSH service or network configuration. Check the following:
- Is the SSH service running? (sudo systemctl status ssh)
- Is the SSH port open in your firewall? (sudo ufw status)
- Is port forwarding correctly configured on your router?
- Are you using the correct IP address?
- Permission Denied: This usually means you're using the wrong username, password, or SSH key. Check the following:
- Is the username correct?
- Are you using the correct password or key?
- Have you copied the public key to the server correctly? (Use `ssh-copy-id`)
- Is the user allowed to login via SSH in the sshd_config file? (AllowUsers directive)
- Host Key Verification Failed: This indicates a problem with the server's host key. This usually happens when the server's key has changed. To resolve this, you can:
- Remove the server's entry from your known_hosts file: (This file is usually located at ~/.ssh/known_hosts on your client machine). You can use the following command to remove the entry: ssh-keygen -R server_ip_address
- Try connecting again. You will be prompted to verify the host key. Accept the key.
- Connection Timeout: This often means the server is unreachable or there's a network problem. Check the following:
- Is the server running?
- Is the server connected to the internet?
- Are you able to ping the server? (ping server_ip_address)
- Check your router and firewall for any restrictions.
- Incorrect Password Prompts (even with key-based authentication): If you are prompted for a password even though you are using key-based authentication, it's possible that password authentication is enabled and your key isn't being used. Ensure that in your sshd_config file, PasswordAuthentication is set to no and that youve correctly set up the public key on the server. Also, confirm the permissions on your `~/.ssh` directory and the files within.
- Firewall Issues: Ensure your firewall isnt blocking SSH traffic. Double-check the UFW rules: `sudo ufw status`. If you made changes, reload UFW: `sudo ufw reload`.
- Incorrect SSH Port Specified: If you changed the SSH port, be absolutely certain you're specifying the correct port number when connecting. Use the `-p` flag: `ssh -p [port_number] your_username@your_server_ip`
- Network Connectivity Problems: Test the connection by pinging the server's IP address to ensure network connectivity. Troubleshoot the network on the client and server sides.
By understanding these common issues and their solutions, you can effectively troubleshoot and resolve SSH problems, ensuring a smooth and secure remote access experience.
11.0 Use Cases of SSH and Its Importance in the IoT Landscape
SSH (Secure Shell) is a versatile tool with numerous applications. Here are some of them:
- Remote System Administration: SSH allows administrators to manage servers and network devices remotely, executing commands, and configuring settings from anywhere in the world.
- Secure File Transfer: Using protocols like SFTP and SCP, SSH facilitates the secure transfer of files between a local machine and a remote server, ensuring data confidentiality and integrity.
- Tunneling and Port Forwarding: SSH can create secure tunnels and forward ports, enabling users to bypass firewalls, access internal network resources securely, and encrypt network traffic.
- Software Development and Deployment: Developers utilize SSH to access remote servers for code deployment, debugging, and version control, streamlining the software development lifecycle.
- Network Troubleshooting: SSH enables network administrators to diagnose and resolve network issues remotely, accessing logs, monitoring network performance, and executing diagnostic commands.
- Automated Scripting and Task Execution: SSH allows users to automate repetitive tasks by executing scripts and commands on remote servers, saving time and reducing manual intervention.
- Secure Access to Cloud Resources: SSH provides secure access to cloud-based virtual machines and servers, allowing users to manage cloud resources, deploy applications, and monitor cloud infrastructure.
- Virtual Private Network (VPN) Configuration: SSH can be used to set up a simple VPN, encrypting network traffic and allowing users to securely access private networks from public locations.
- Database Management: SSH enables secure access to remote databases, allowing administrators to manage, query, and update databases securely from a remote location.
- Remote Access to IoT Devices: SSH facilitates remote access to IoT devices, enabling users to monitor, configure, and manage these devices securely from anywhere.
- Security Monitoring and Auditing: SSH is used to monitor server activity, audit logs, and detect security threats remotely, enabling timely responses to security incidents.
Tools to consider
There are also many tools that can assist in the management of SSH
- 1password ssh agent: This allows you to generate, store, and manage SSH keys. It simplifies key management and enhances security.
By mastering SSH, you can keep your IoT devices running smoothly from anywhere in the world, offering a level of convenience and control akin to having a remote control for your entire smart home or office setup. In short, you should smartly use SSH commands.


Detail Author:
- Name : Brycen Ritchie
- Username : abechtelar
- Email : nicholaus.lind@hotmail.com
- Birthdate : 1977-09-30
- Address : 932 Nolan Street Apt. 440 Myrtisstad, ID 52983-8120
- Phone : +1.662.916.4319
- Company : Lebsack-Beier
- Job : Gas Pumping Station Operator
- Bio : Et voluptate similique animi consectetur voluptas. Quidem deleniti magnam in aspernatur architecto. Facere ullam dolores fuga nulla. Ut et iusto officiis vero ea autem possimus.
Socials
instagram:
- url : https://instagram.com/torphye
- username : torphye
- bio : Quam aut ullam eum aut. Tenetur sit sit et consequatur. Voluptas voluptatem asperiores dicta odit.
- followers : 926
- following : 2850
linkedin:
- url : https://linkedin.com/in/ephraim_xx
- username : ephraim_xx
- bio : At nobis omnis sed expedita.
- followers : 6175
- following : 880
tiktok:
- url : https://tiktok.com/@ephraim_id
- username : ephraim_id
- bio : Deleniti ut animi at explicabo fuga eveniet. Fugit iure quia quam a magnam et.
- followers : 4009
- following : 2646
twitter:
- url : https://twitter.com/torphye
- username : torphye
- bio : Quod molestias consequatur aut voluptatem repellendus. Ratione quis aut et deserunt aliquid. Eligendi aliquid voluptatem tempora suscipit minima.
- followers : 6259
- following : 2453
